How to Create Memecoin on Solana
Recently, memecoins have become increasingly popular, and developing one on Solana could be an excellent method to join the craze while also taking advantage of the Solana network's speed and effectiveness.
-
Table of Contents
- Why Solana?
- Key Components of Memecoin Creation on Solana
- How to Create Your Memecoin on Solana? Step-by-Step Guide
- Step 1: Define Your Concept and Branding
- Step 2: Start Your Creation
- Step 3: Connect Your Wallet
- Step 4: Add Information about Your Token
- Step 5: Wait until It’s Ready
- Step 6: Check the Address
- Step 7: Disable the Freeze Authority
- Step 8: Disable the Mint Authority
- Step 9: Register Trading Pair and Create a Pool
- Step 10: Market and Promote Your Memecoin
- Bottom Line
While $WIF and $SLEFR memecoins are gaining more popularity, people are trying to saddle the wave of success and create their own memecoins on Solana, hoping will bring them much. Is that so?
Why Solana?
Solana has emerged as a prominent blockchain platform known for its high-speed transactions and low fees. Its architecture is designed to handle a large volume of transactions, making it an ideal choice for projects requiring scalability and efficiency. Additionally, Solana's ecosystem offers robust development tools and a vibrant community, providing creators with the resources needed to bring their memecoin ideas to fruition.
The success of dogwifhat shows that it may seem true, but, as we all know, the crypto market is something that can’t be predicted for sure. At the same time, Solana memecoins are beating the top charts, bringing the same fame and popularity to the $SOL itself.
Thus, let’s see, how to create memecoin on Solana, if you want one.

Key Components of Memecoin Creation on Solana
Creating a memecoin on Solana involves several key components, each playing a crucial role. These components include:
- Smart Contract Development: Smart contracts are self-executing contracts with the terms of the agreement directly written into code. On Solana, developers utilize programming languages like Rust to create smart contracts that govern the functionality of memecoins, including token distribution, transaction rules, and governance mechanisms.
- Tokenomics Design: Tokenomics refers to the economic model and mechanics of a cryptocurrency. When creating a memecoin, developers must carefully consider factors such as token supply, distribution mechanisms, inflation rates, and utility features. A well-designed tokenomics model can incentivize community participation and contribute to the long-term sustainability of the memecoin project.
- Community Engagement: Community engagement is essential for the success of any memecoin project. Building a strong and supportive community can help drive adoption, foster liquidity, and amplify the meme coin's viral potential. Social media platforms, online forums, and community-driven initiatives play a crucial role in cultivating and nurturing the memecoin community.
- Marketing and Promotion: Effective marketing and promotion are vital for generating awareness and attracting users to the memecoin project. Creative branding, engaging content, and strategic partnerships can help elevate the memecoin's visibility and capture the attention of meme enthusiasts and cryptocurrency investors alike.
How to Create Your Memecoin on Solana? Step-by-Step Guide
Every 10 minutes, more than ten tokens appear based on Solana, so it’s quite a popular activity today. However, let’s define the main steps to create your own Solana memecoin.
Step 1: Define Your Concept and Branding
Before creating your memecoin, you need a clear idea of what your coin represents and how you want to brand it. Think about the meme or theme you want to base your coin on, as well as the name, logo, and other branding elements.
Step 2: Start Your Creation
Go to the HoneyChain website. Navigate to the Create Token tab and select the contract you want to deploy, in our case, it is the Solana token.
Step 3: Connect Your Wallet
This option will be available by clicking the purple button on the top right corner of the screen. The wallet must support Solana.

Source and Copyright © HoneyChain
Step 4: Add Information about Your Token
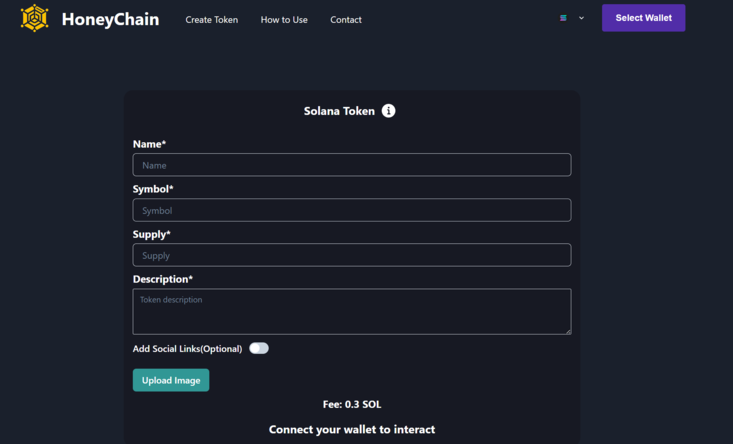
Fill in the main information about your future token, including everything you see below: from name to description and image.
Source and Copyright © HoneyChain
After clicking on the create button, accept the transaction and wait until the token is ready. The creation of the Solana token costs 0.3 $SOL, including fees for the Solana Program Library token creation.
Step 5: Wait until It’s Ready
The creation process will start and will take some seconds. You will receive the total supply of the token in the wallet you chose after. In addition, you will need to confirm the amount you’ll get, so, push the “Confirm” button, and wait 20 seconds more. In the end, you will get the deployed contract address.
Step 6: Check the Address
To check the address you may go to the Solana Scan and add your address to the tab. Check the name, image, supply, and other important details
Step 7: Disable the Freeze Authority
Freezing a token account means that the tokens held in that account become temporarily inaccessible, effectively preventing any transactions involving those tokens. However, the pool documentation tells us to disable “Freeze authority” for the base token.
To do that return to the HoneyChain website, and paste the token address into the “Revoke Freeze Authority” field.
Step 8: Disable the Mint Authority
In Solana token creation, the "mint authority" refers to a designated address or entity that has the exclusive privilege to create new tokens of a specific type, known as a "mint."
In our case, we may disable that option, again, on the HoneyChain website, you need to paste the token address into the “Revoke Mint Authority.” However, it is not necessary; it is only needed when you want to strengthen the trust and loyalty of your users.
Step 9: Register Trading Pair and Create a Pool
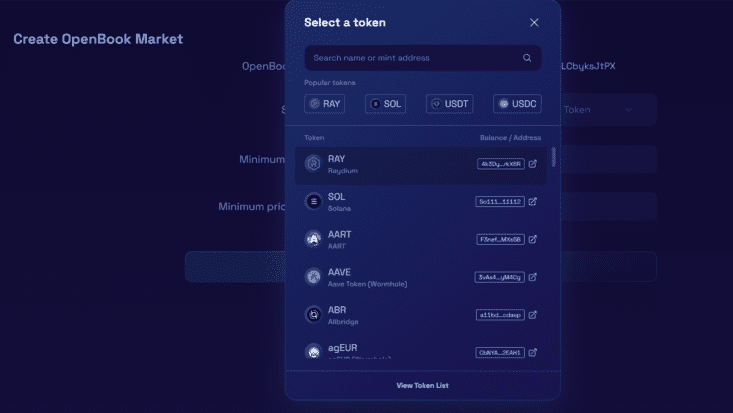
To let people trade your token, you need to register a trading pair in OpenBook at this link. It will cost 3-4 $SOL.
Connect the wallet (the top right corner of the screen) where your token is located.

Source and Copyright © Raydium
Select your token in the first field (paste the address) and fill in the other lines about your token details.
Source and Copyright © Raydium
Select the $SOL token in the second field, and fill in other lines.

Source and Copyright © Raydium
Push the “Create Market” button

Source and Copyright © Raydium
Pay commission fees for all the actions.
Then you’ll get the ID, take it, and go to the Pools page. Click the “Create Pool” button to paste your ID and create Pool.

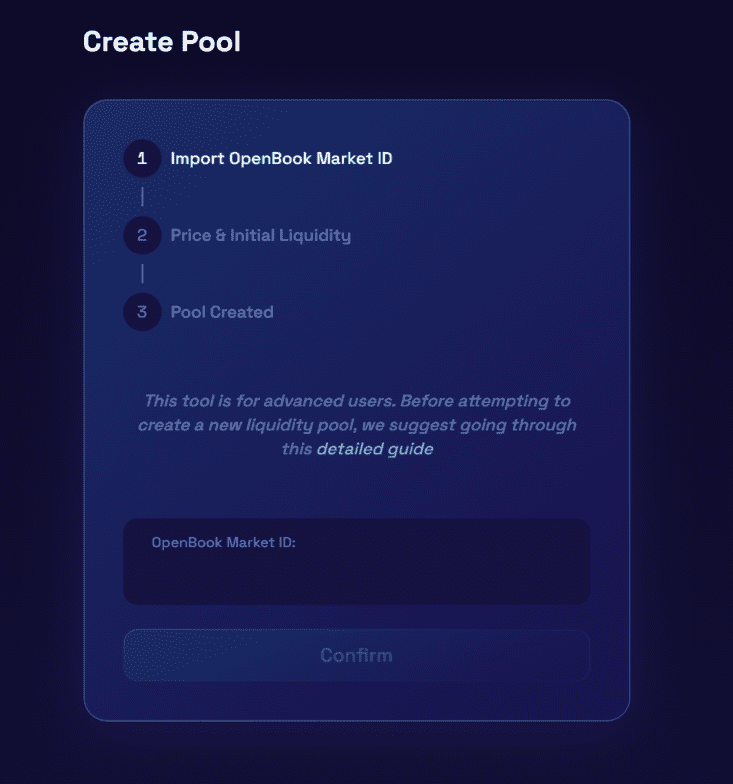
Source and Copyright © Raydium
The Pool is ready, so, people can trade your token. You’re awesome!
Step 10: Market and Promote Your Memecoin
Once your memecoin is live, it's time to start marketing and promoting it to attract users and investors. Use social media, forums, and other channels to spread the word about your memecoin and engage with your community.
And there you have it, that's how you can create your memecoin on the Solana blockchain. We hope you found this tutorial helpful.

Bottom Line
The intersection of memes and cryptocurrency presents a unique opportunity for creators to explore new avenues of expression and innovation. With the power of Solana's blockchain technology, individuals can now realize their memecoin aspirations, bringing to life digital currencies that reflect the humor, creativity, and community spirit of internet memes. By understanding the fundamentals of memecoins, leveraging Solana's capabilities, and fostering active community participation, creators can embark on an exciting journey into memetic finance.
At the same time, it is important to note that you should be vigilant and careful, even when creating personal memecoin. Try to be honest with yourself and the people that will be users of your project, because DYOR can be done for your project either…and, maybe even Scamometer review :)


